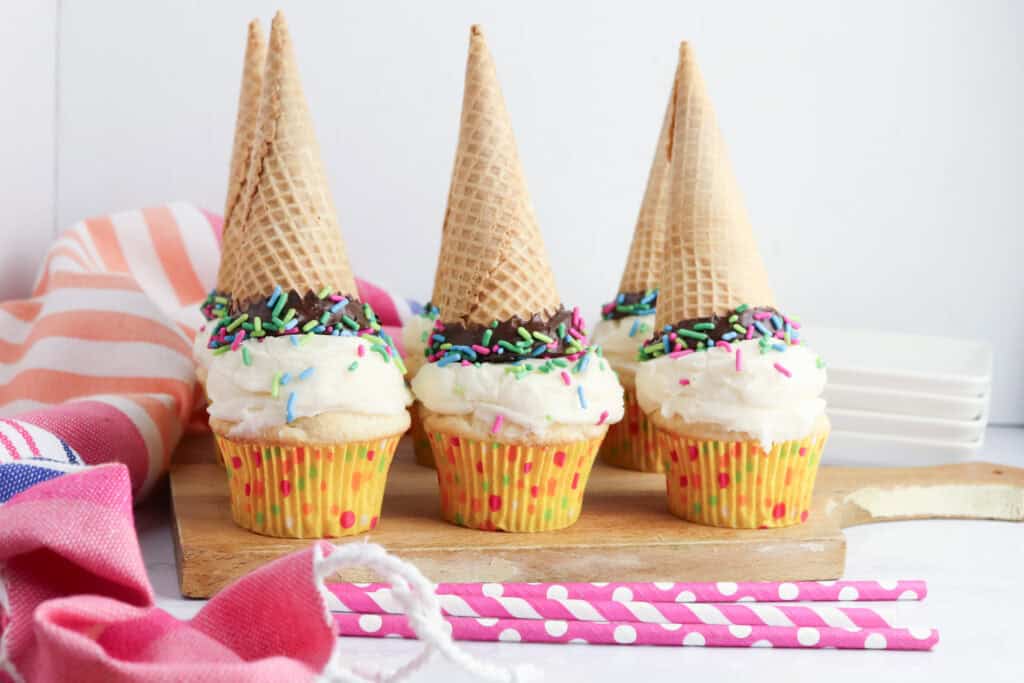
The Cutest Ice Cream Cone Cupcakes
Whether you’re searching for a fun birthday treat or a cute snack to serve this summer, you can’t go wrong with these adorable ice cream cone cupcakes! Boxed cake mix is transformed into an adorable dessert topped with vanilla ice cream frosting and chocolate-dipped cones. They’re sure to be a hit with the kids at any celebration.
For more creative dessert ideas, be sure to check out my Fresh Peach Pie Bars, Easy Cake Mix Chocolate Chip Cookie Bars, and these refreshing Mixed Berry Desserts.

Why You’ll Love This Recipe
- These look like real ice cream cones, but they’re actually cupcakes with frosting.
- You don’t need to make anything from scratch – boxed cake mix anstoreboughtht cones keep things easy.
- They’re fun to decorate with kids and perfect for birthdays.
- You can customize the frosting flavor with your favorite ice cream.
- They’re portable when you prep ahead and assemble at your destination.
Ingredients

While these cute treats look complicated, they’re actually super simple to make thanks to the short list of ingredients in the recipe. To make your own cupcakes topped with ice cream buttercream, you’ll need:
- Boxed White Cake Mix: You can use any flavor of cake mix you want to prepare these treats. Or use store-bought cupcakes and remove the icing to decorate with your own toppings.
- Butter: The base of your frosting is butter. It’s best to use regular, unsalted butter for this recipe to ensure your icing has the best consistency.
- Vanilla Ice Cream: Add ice cream flavor to your dessert by using real ice cream in the frosting. If you prefer to change up the flavor, go ahead! Any flavor of ice cream will work when preparing your buttercream.
- Vanilla Extract: Use a small amount of vanilla extract to enhance the flavor of your buttercream.
- Powdered Sugar: The finishing touch to your buttercream is powdered sugar. This will help sweeten and thicken your icing, making it stable when you top your cupcakes.
- Sugar Cones: We topped our ice cream cupcakes with sugar cones, but any type of cone is a great choice for your own decorating, including waffle cones and cake cones.
- Chocolate Chips: Turn your plain cones into a delicious treat with the help of some melted chocolate!
- Colorful Sprinkles: Finish decorating the top of your treats and your cones with a handful of rainbow sprinkles.
Substitutions and Additions
- Swap in a Different Cake Mix: Chocolate, strawberry, or funfetti work great too.
- Try a New Ice Cream Flavor: Use mint chip, strawberry, or peanut butter ice cream for a new twist on the frosting.
- Change up the Cones: Use cake cones or waffle cones instead of sugar cones.
- Add a Cherry on Top: For even more fun, place a cherry on the top of each cupcake for a true sundae look.
Step by Step Instructions

Once you see how simple it is to prepare these adorable snacks, they’re going to be your go-to summer dessert! All you have to do is follow these easy instructions for decorating your ice cream treats for your kids.
1. Bake the Cupcakes
Start by preparing the cake mix according to the package instructions. Bake the batter in cupcake liners and allow the cupcakes to cool completely.
2. Melt the Ice Cream
While you wait for your cupcakes to cool, remove the ice cream from the freezer and allow it to melt.

3. Decorate The Ice Cream Cones
While the cupcakes are cooling, you can also take the time to decorate your ice cream cones. Place the chocolate chips in a microwave-safe container and heat them in 30-second increments, stirring between each increment, until the chips are fully melted.
Dip the top of each cone in the melted chocolate, then lightly tap the side of the cone to help the extra chocolate drip off. Immediately after dipping the cone in chocolate, decorate it with sprinkles to ensure the sprinkles stick.

After that, transfer the chocolate-covered cones to a piece of parchment paper to cool. You can place the cones in the refrigerator to chill to help speed up the hardening process.

4. Make the Ice Cream Frosting
Now that your cupcakes are cool, the cones are decorated, and the ice cream is melted, it’s time to start mixing up your buttercream. Start by beating together the butter and vanilla extract until creamy.

Then, add ¼ cup of the melted ice cream to the bowl, along with the powdered sugar. Beat the ingredients together until smooth.
Add more ice cream if the frosting is too thick. Mix in one tablespoon at a time until you reach your desired consistency.

5. Assemble the Cupcakes
When your buttercream is ready to go, grab your ice cream scoop to get a realistic ice cream look on the top of each cupcake.

Scoop the buttercream and lightly press it onto the top of each cupcake. Then, use a spatula or the back of a spoon to smooth out the top.

Decorate each of your cupcakes with a few rainbow sprinkles. Then, press your chocolate-covered cones into the top of each treat.

Can I Make Ice Cream Cone Cupcakes in Advance?
Once you place the ice cream cones on top of each cake, you risk the cones going stale. So, I wouldn’t recommend assembling the cupcakes until you’re ready to serve them.
But you can do a few things ahead of time to help speed up the decorating process. The cupcakes can be prepared up to one day in advance. And you can decorate the cones with chocolate up to one day in advance, as long as you store them in an airtight container until you’re ready to decorate.
How to Transport Ice Cream Cone Cupcakes
These adorable treats are perfect for a party! But when they’re assembled, they can be difficult to transport to your party location. If you plan to serve your cupcakes away from home, I would suggest transporting the cones separately from the cupcakes. Once you reach your destination, simply place the chocolate-covered cones on top of each treat.
Tips and Notes
- Let cupcakes cool completely before frosting to avoid melting the buttercream.
- Use a shallow container or muffin tin to transport cones and cupcakes separately.
- As noted above, you can make the cones and cupcakes one day ahead, but wait to assemble until serving.

Serving Suggestions
- Serve with fruit skewers or a bowl of fresh berries.
- Pair with a scoop of ice cream for an extra decadent dessert.
- Create a cupcake “bar” where kids decorate their own cones with sprinkles and toppings.
Storage and Reheating Instructions
- Store unfrosted cupcakes in an airtight container at room temperature for up to 2-3 days.
- Store decorated cones separately in an airtight container to keep them crisp.
- Avoid refrigerating assembled cupcakes with cones – the cones can become soft and stale.

Ice Cream Cone Cupcakes
Ingredients
- 1 box white cake mix prepared according to package instructions
- 1 cup butter softened
- 1/3 cup vanilla ice cream
- 1 teaspoon vanilla extract
- 4 cups powdered sugar
- 1/2 cup chocolate chips melted
- 22 ice cream cones
- Rainbow sprinkles
Instructions
- Bake the cupcakes according to the box, then allow to cool completely.
- While the cupcakes are cooling, set out the ice cream to melt.
- Dip the top of each ice cream cone into the melted chocolate and decorate with rainbow sprinkles. Set aside to harden.
- Beat together the butter and vanilla until smooth.
- Add 1/4 cup of the melted ice cream and powdered sugar and beat until smooth. Add more ice cream, one tablespoon at a time to thin the frosting, if needed.
- Use an ice cream scoop to scoop the ice cream frosting onto the top of each cupcake. Smooth out the top of the icing with a flat spatula, if needed.
- Top the cupcakes with rainbow sprinkles, then press the decorated ice cream cones into the top of each cupcake before serving.
Notes
- Let cupcakes cool completely before frosting to avoid melting the buttercream.
- Use a shallow container or muffin tin to transport cones and cupcakes separately.
- You can make the cones and cupcakes one day ahead, but wait to assemble until serving.


