Oreo Spiders Halloween Cookies
Get ready to create the most adorable (and slightly spooky) Halloween treats that will have everyone crawling back for more! These Oreo Spiders are incredibly easy to make and require no baking whatsoever.

These cute treats are perfect for anyone looking to create memorable Halloween moments without spending hours in the kitchen. What makes them especially wonderful is how simple they are to assemble – even the youngest helpers can participate in the fun!
If you’re looking for more fun Halloween recipes, you’ll definitely want to check out my Mini Candy Corn Cheesecakes, Halloween Rice Krispie Treats, Halloween Oreos, and Halloween Rolo Pretzels for a complete spooky spread!

Why You’ll Love This Recipe
- No baking required – perfect for busy Halloween schedules.
- Kid-friendly assembly that makes for great family bonding time.
- Customizable with different Oreo flavors and decorating options.
- Ready in just 30 minutes from start to finish.
- Makes the perfect classroom treat or Halloween party contribution.
Ingredients

- Double Stuf Oreo Cookies: The foundation of our spiders, providing the perfect round body shape. Double Stuf works best because the extra cream filling helps hold the legs in place, giving our spiders that authentic, dark, spooky look.
- Pocky Sticks: These thin, crunchy snack sticks are ideal for spider legs when cut in half. The chocolate coating adds extra flavor and helps them blend smoothly with the Oreo base.
- Dark Chocolate Melting Wafers: Acts as both the “glue” to hold everything together and adds a glossy finish to the spider tops. Melting wafers melt smoothly and set up perfectly, amplifying the spooky Halloween aesthetic.
- Candy Eyeballs: The eyeballs bring these spiders to life! These edible decorations transform simple cookies into adorable creatures and are readily available in most baking aisles.
Substitutions and Additions
- Oreo Cookie Variations: Try Pumpkin Spice Oreos for extra Halloween flavor, Chocolate Peanut Butter for a richer taste, or even Golden Oreos for a lighter-colored center.
- Pocky Stick Alternatives: Plain pretzel sticks work wonderfully and are often more budget-friendly. Black licorice sticks create ultra-spooky legs, while red licorice gives a fun twist. Chocolate-covered pretzel rods can be cut down to size for sturdier legs.
- Chocolate Options: Semi-sweet or dark chocolate chips can replace melting wafers – just add a teaspoon of coconut oil for smoother melting. Milk chocolate creates a sweeter flavor profile, while white chocolate melting wafers can be tinted with food coloring for colorful spiders.
- Frosting Swap: Use store-bought chocolate frosting instead of melted chocolate for easier assembly – no melting required, and it stays soft for easier eating.
Step by Step Instructions

Prep Your Workspace
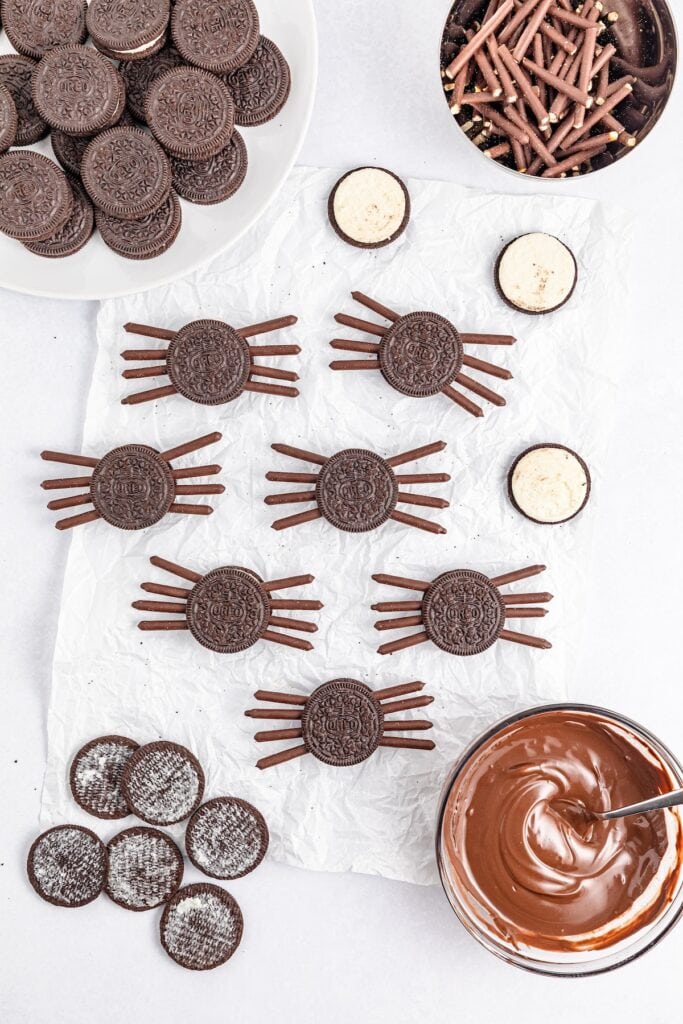
Line a large baking tray with parchment paper and set aside. Having your workspace organized makes assembly much smoother, especially if you’re working with kids. You may need multiple trays depending on how many spiders you’re making.

Prepare the Spider Legs
Cut each Pocky stick in half, removing the exposed pretzel end first for cleaner cuts. You’ll need 8 leg pieces per spider (4 on each side). This step can be done ahead of time and is perfect for getting kids involved in the prep work.

Separate the Cookies
Carefully twist apart each Oreo cookie, keeping both halves intact. Try to keep most of the cream filling on one side – this will be your base. The cream helps anchor the legs and provides stability for your spider structure.

Melt the Chocolate
In a microwave-safe bowl, melt the chocolate wafers using 30-second intervals on low power, stirring between each interval. This prevents burning and ensures smooth, glossy chocolate. The mixture should be completely smooth and easily spreadable when ready.

Assemble the Spider Bodies
Take your Oreo base (the half with more cream) and gently press 4 Pocky leg pieces into each side, angling them slightly downward for a realistic spider stance. The cream filling should hold them in place, but don’t worry if they seem loose – the chocolate will secure everything.

Add the Chocolate Glue
Spoon a small amount of melted chocolate onto the center of each spider base. This acts as adhesive to hold the top cookie and ensures your spider cookies stay together. Use just enough to create a thin layer.
Top with Second Cookie
Gently place the second Oreo half on top, pressing lightly to secure. The legs should now be firmly sandwiched between the two cookie halves. Take care not to press too hard and break the cookies.

Create the Spider Top
Spread a thin, even layer of melted chocolate over the top cookie using the back of a spoon. This gives your spider a glossy finish and provides a surface for the eyes to stick to. Work quickly as the chocolate will begin to set.

Add the Eyes
While the chocolate is still wet, place 2-3 candy eyeballs on the lower center portion of each spider. Press gently to ensure they stick. Adding eyes while the chocolate is tacky ensures they’ll stay in place once set.

Set and Serve
Allow spiders to set completely at room temperature for 15-30 minutes, or refrigerate for quicker setting. The chocolate should be firm to the touch before serving or storing.

Tips and Notes
- Temperature Control: Work in a cool kitchen when possible – warm temperatures can make the chocolate set too quickly or become too soft to work with effectively.
- Leg Positioning: Angle the legs slightly backward and downward for the most realistic spider appearance.
- Eye Placement: Position eyes closer to the front edge of the spider for the most appealing look. Avoid centering them perfectly – slightly off-center creates more personality.
- Chocolate Consistency: If your melted chocolate becomes too thick while working, reheat briefly in 10-second intervals. If it’s too thin, let it cool slightly before continuing.
- Make-Ahead Tip: These can be assembled up to 2 days in advance and stored covered at room temperature, making them perfect for party prep.

Serving Suggestions
- Halloween Party Display: Arrange on a black platter with plastic spiders and fake spider webs for maximum spooky impact.
- Gift Packaging: Place individual spiders in clear treat bags tied with orange and black ribbons for perfect party favors or trick-or-treat alternatives.
- Themed Presentation: Serve on Halloween-themed plates with other spooky treats like “dirt cake” or pumpkin-shaped cookies for a complete Halloween dessert table.
- School Events: Pack in individual containers for classroom parties – they won’t make a mess like traditional frosted treats.

Storage and Reheating Instructions
- Room Temperature Storage: Store in an airtight container at room temperature for up to 5 days. Layer between parchment paper to prevent sticking if stacking.
- Refrigerated Storage: For longer storage, keep in an airtight container in the refrigerator for up to 2 weeks. The chocolate will be firmer but still delicious.
- Freezing Option: These can be frozen for up to 3 months in a freezer-safe container. Thaw at room temperature for 30 minutes before serving.
- Serving from Storage: If refrigerated, let come to room temperature for 15 minutes before serving for the best texture and flavor.
- Transport Tips: For taking to parties, keep chilled until the last moment and transport in a sturdy container to prevent leg breakage.

Oreo Spiders Halloween Cookies
Equipment
- Baking tray
- Parchment paper
- Microwave or double boiler to melt chocolate
- Rubber Spatula
Ingredients
- 16 Double Stuf Oreo cookies
- 2 boxes Pocky sticks (2.47 oz per box)
- 10 ounce package dark chocolate melting wafers
- 32 candy eyeballs
Instructions
- Line a large baking tray with parchment paper and set aside. You may need multiple trays depending on how many spiders you’re making.
- Cut each Pocky stick in half, removing the exposed pretzel end first for cleaner cuts. You’ll need 8 leg pieces per spider (4 on each side). This step can be done ahead of time and is perfect for getting kids involved in the prep work.
- Carefully twist apart each Oreo cookie, keeping both halves intact. Try to keep most of the cream filling on one side – this will be your base.
- In a microwave-safe bowl, melt the chocolate wafers using 30-second intervals on low power, stirring between each interval. The mixture should be completely smooth and easily spreadable when ready.
- Take your Oreo base (the half with more cream) and gently press 4 Pocky leg pieces into each side, angling them slightly downward for a realistic spider stance.
- Spoon a small amount of melted chocolate onto the center of each spider base.
- Gently place the second Oreo half on top, pressing lightly to secure. Take care not to press too hard and break the cookies.
- Spread a thin, even layer of melted chocolate over the top cookie using the back of a spoon. Work quickly as the chocolate will begin to set.
- While the chocolate is still wet, place 2-3 candy eyeballs on the lower center portion of each spider. Press gently to ensure they stick.
- Allow spiders to set completely at room temperature for 15-30 minutes, or refrigerate for quicker setting. The chocolate should be firm to the touch before serving or storing.